The first steps in Angular 10
A beginner-friendly guide to getting started with Angular 10, covering the essential setup and basics for new developers.
Introduction
Angular is an application design framework and development platform for creating efficient and sophisticated single-page apps.
Most of the time when developers talk about AngularJS then they are talking about Angular version one (1.0-1.8).
In 2016 Google published the second version of Angular. Since that time when we are talking about Angular, we are referring to the versions above two (2<X). Angular 2, 4, 5, 6, 9, 10 are almost identical with small differences. In this series, I would like to write about the features of Angular 10 but in this episode, I will write about the first steps in Angular 10
Installation
To be able to work freely with any kind of front-end framework you need to have at least one version of the Node JavaScript runtime environment. Node.js has several versions and it is a common thing that you need to upgrade and downgrade them based on your project.
Due to this, it is a good practice to have another program that manages multiple Node.JS versions parallel. The name of this program is Node Version Manager aka NVM. You can find NVM to Linux / Windows and macOS too.
Let's start with a blank Bootstrap 3 project
Assuming we already have NVM on our computer and we already installed the latest Node.JS version and NPM through NVM. We can create a new blank project from ground zero.
Let's run the following command in our command-line tool. It can be a terminal, power Shell, or Windows cmd.
sudo npm install -g @angular/cli@latest
In order to install Angular on macOS or on Linux, you might need to use the sudo command to install it as an Administrator. Under Ubuntu 18.04 with NVM, sudo command is not necessary.
Anyway, in general, I prefer using Bootstrap for front-end work, so if it happened you wanted to try Bootstrap version 3, you can do this with the following command.
npm install --save bootstrap@3
Now we have the Angular Framework and we have the Bootstrap one but they do not know anything about each other at this stage. We need to introduce them to each other. So we have to add the path of the bootstrap.min.css file in the styles section of the angular.json file.
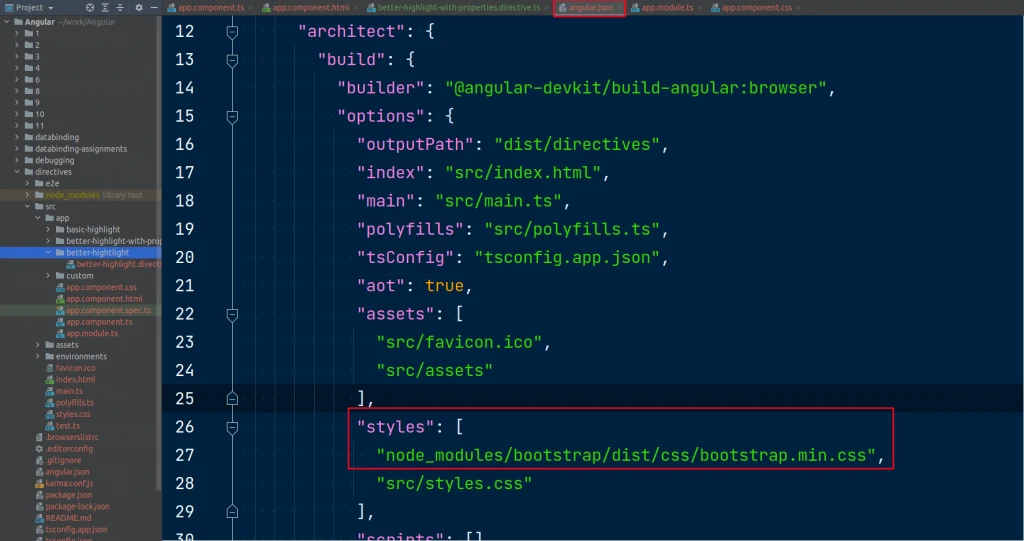
So we have to add the path of the bootstrap.min.css file
The above bootstrap installation command created a new Boostrap folder inside the node_modules folder. That folder contains the 'bootstrap.min.css' we need to use.

Bootstrap folder structure
Create and Run
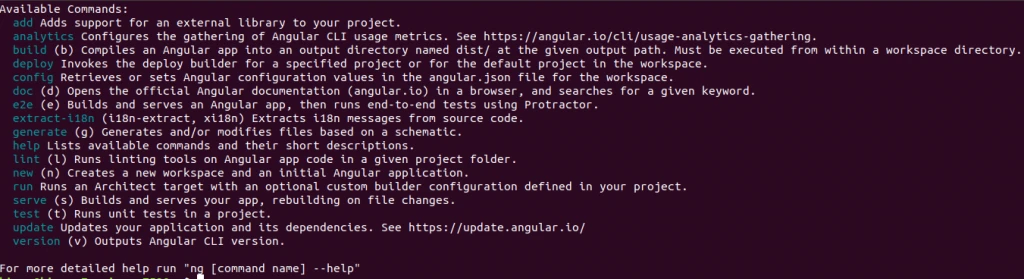
The installed Angular comes with a command-line tool. If you type the ng command into the terminal and hit enter you can see a list of commands.
Bootstrap folder structure
If we type the ng new [project-name] command we can create our project.
# new (n) Creates a new workspace and an initial Angular application.
ng new my-dream-app
So far, we installed the Framework and Bootstrap. We taught Angular to handle Bootstrap and we created an empty project. The only missing piece is to launch the project.
# Let's run the Application
ng serve
The ng serve command will run the development server of Angular. While ng serve is running the Framework checks all the changes in the project and rebuilds the project if any changes happened.
Notes:
- Unfortunately,on Linux the real-time watch is not working properly.
- The issue is solved with the following command:ng serve --poll=2000
- https://github.com/guard/listen/wiki/Increasing-the-amount-of-inotify-watchers
- https://github.com/angular/angular-cli/issues/8313#issuecomment-362728855
- Notes: On Linux file systems the changes are connected to the ‘inotify’ listener number. This number defines the watchable file numbers. If this number exceeds then changes will not be detected.
Conclusion
In this episode, I covered only the basic steps if someone wants to start playing and going deeper into the Angular Framework. In the next episodes I want to go into the details of the Modules, Components, Databinding, Directives, Views, and Debugging sections and the Framework.
Useful Topic related Links
Episodes
- First steps
- Modules
- Components
- Databindings
- Directives
- Views
- Debugging